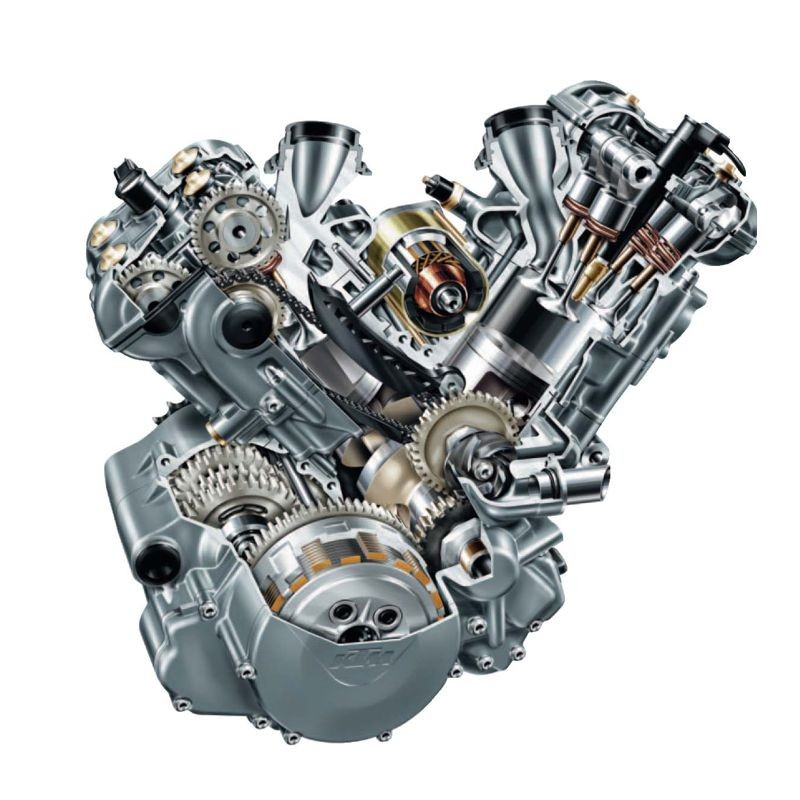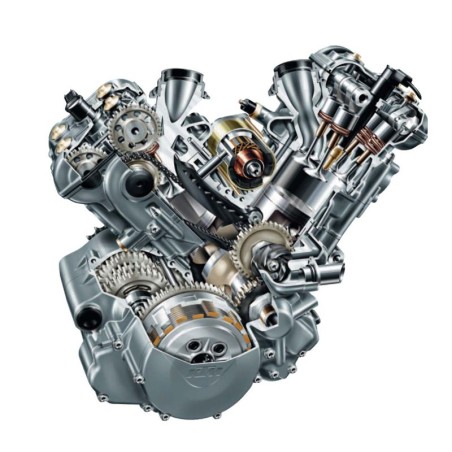

KTM 950, 990 ENGINE - WORKSHOP, SERVICE, REPAIR MANUAL
- English Service Manual / Repair Manual, for KTM 950, 990 Engines.
CONTENTS:
General Information
- Oil System
- Air Intake System
- Sls-System
- Cooling System
- Abs-System
- Special Tools - Engine
- Special Tools - Chassis
- Bleeding The Clutch
- Resetting The Control Unit After Replacing/Repairing The Engine
- Adjusting The Throttle Cable For Models With Fuel Injection
- Ecu-Software Update/Mapping
- Bleeding The Cooling System
- Checking The Oil Pressure
Removing And Refitting Engine
- 950 Adventure
- Removing The Engine
- Refitting The Engine
- 990 Super Duke
- Removing The Engine
- Refitting The Engine
- 950 Supermoto
- Removing The Engine
- Refitting The Engine
Disassembling The Engine
- Valve Covers
- Spark Plug Shaft Inserts
- Starter Motor
- Setting Cylinder Rear To Tdc
- Camshafts Cylinder Rear
- Chain Tensioner Cylinder Rear
- Timing Chain Cylinder Rear
- Double Timing Gear
- Cylinder Head Rear With Cylinder
- Setting Cylinder Front To Tdc
- Camshafts Cylinder Front
- Oil Pressure Switch
- Chain Tensioner Cylinder Front
- Timing Chain Cylinder Front
- Cylinder Head Front With Cylinder
- Water Pump
- Oil Screen
- Clutch Cover
- Clutch
- Primary Pinion And Clutch
- Generator Cover
- Rotor
- Freewheel
- Balancer Shaft
- Shift Mechanism
- Engine Case Half
- Transmission
- Oil Pumps
Servicing Individual Components
- Roller Bearing
- Main Bearings - General Information
- Replacing Bearing Shells, Output End
- Replacing Bearing Shells, Generator End
- Replacing The Conrod Bearings
- Selecting The Bearing Shells
- Replacing The Supporting Bearings In The Clutch Cover
- Overhauling The Water Pump
- Checking The Suction Pump For Wear
- Checking The Pressure Pump For Wear
- Bypass Valve
- Disassembling The Cylinder Head And Checking Parts For Wear
- Checking The Pistons
- Assembly Instructions For Piston Rings
- Checking The Piston Ring End Gap
- Measuring Pistons + Cylinders, Establishing The Piston Mounting Clearance
- Piston And Cylinder Identification
- Assembling The Cylinder Head
- Generator Cover
- Torque Limiter
- Valve Gear - Checking Parts For Wear
- Preassembling The Spreader
- Clutch - Checking Parts For Wear
- Shift Mechanism - Checking Parts For Wear
- Preassembling The Shift Shaft
- General Information On Servicing The Transmission
- Assembling The Main Shaft
- Assembling The Countershaft
- Checking The Freewheel
- Replacing The Freewheel Hub
- Starter
Assembling The Engine
- Oil Pumps
- Axial Clearance Of The Main Shaft
- Transmission
- Case Half
- Shift Mechanism
- Aligning The Return Spring
- Balancer Shaft
- Freewheel
- Rotor
- Generator Cover
- Timing Chain And Balancing Weight
- Primary Pinion
- Outer Clutch Hub
- Clutch Disks
- Clutch Cover
- Oil Screen
- Water Pump
- Cylinder Head Rear With Timing Chain
- Chain Tensioner Cylinder Rear
- Camshafts Cylinder Rear
- Setting Cylinder Front To Tdc
- Cylinder Head Front With Timing Chain
- Chain Tensioner Cylinder Front
- Oil Pressure Switch
- Camshafts Cylinder Front
- Starter Motor
- Spark Plug Shaft Inserts
- Valve Cover
Electrical
- Checking For Loss Of Current
- Dismounting The Battery
- Charging The Battery
- Jump Start
- Checking The Charging Voltage/ Rectifier Regulator
- Checking The Generator Coils
- Electric Starter System 950 Adventure
- Electric Starter System 990 Super Duke
- Electric Starter System 950 Supermoto/950 Super Enduro
- Electric Starter System 990 Adventure
- Checking The Auxiliary Starter Relay
- Functional Check Of The Auxiliary Starter Relay
- Checking The Diodes
- Checking The Starter Relay
- Checking The Starter Motor
- Checking The Clutch Switch
- Checking The Tip Switch And The Emergency Off Switch
- Troubleshooting In The Starter System
- Ignition System, Ecu 950 Adventure
- Ignition System, Ecu 950 Supermoto
- Ignition System, Ecu 950 Super Enduro .
- Checking The Ecu 950 Adventure/950 Supermoto/Super Enduro
- Checking The Pulse Generator 950 Adventure/Supermoto/Super Enduro
- Checking The Fuel Pump Relay 950 Adventure/Supermoto/Super Enduro
- Checking The Ignition Coils (Carburettor Models Only)
- Troubleshooting In The Ignition System 950 Adventure/Supermoto/Super Enduro
- The Epc System 950 Adventure
- The Epc System 950 Supermoto
- The Epc System 950 Super Enduro
- Checking The Solenoid Valve For The Epc 950 Adventure/950 Supermoto
- Checking The Gear Sensor 950 Adventure/950 Supermoto
- Carburetor Heater 950 Adventure/Supermoto/Super Enduro
- Injection/Ignition System
- Establishing The Injection Period
- Correction Sensors And Inputs
- System Diagram
- Basic Description Of The System
- Wiring Diagram 990 Super Duke
- Wiring Diagram 990 Adventure
- Block Diagram
- Description Of The Electric System
- Description Of The Components
- Safety Against Failure/Emergency Operation
- Component Tests
- Error Codes
- Abbreviations, Limit Values 990 Super Duke
- Abbreviations, Limit Values 990 Adventure
- Alarm System 990 Super Duke
- Order For Additional Hand-Held Transmitters
- Adapting The Hand-Held Transmitter
- Starting With The Emergency Code
- Abs-System 990 Adventure
- Checking The Fuses
- Checking The Abs Fault Memory Using The Ktm Diagnostics Tool
- Checking The Abs Sensor With The Ktm Diagnostics Tool
Fuel System
- Keihin Carburetor Cvrd 43
- Description Of The Acv (Air Cut Valve) System
- Disassembling The Carburetor
- Assembling The Carburetor
- Checking The Float Level
- Adjusting The Mixture Control Screw
- Checking The Throttle Sensor
- Adjusting The Thottle Sensor
- Adjusting The Choke Cable
- Adjusting The Throttle Cables
- Synchronizing The Carburetor
- Adjusting The Idle Speed
- Carburetor Heater
- Keihin Electronic Fuel Injection
- Adjusting The Throttle Cable
- Dismounting/Mounting The Throttle Body
- Dismounting/Mounting The Fuel Pump
- Replacing The Fuel Filter
- Checking The Fuel Pressure
Trouble Shooting
Chassis
- Dismounting/Mounting The Front Wheel
- Dismounting/Mounting The Rear Wheel
- Replacing The Front Wheel Bearing
- Replacing The Rear Wheel Bearing
- Replacing The Front Brake Pads
- Replacing The Rear Brake Pads
- Replacing The Fork Legs
- Replacing The Shock Absorber
- Replacing The Steering Head Bearing
- Replacing The Swing Arm Bearing
- Replacing The Chain, Pinion And Rear Sprocket
- Cutting And Riveting The Chain
- Replacing The Abs Unit
- Replacing The Front Abs Sensor
- Replacing The Rear Abs Sensor
Technical Specifications
- 950 Adventure
- Engine
- Chassis
- 990 Super Duke / Super Duke R
- Engine
- Chassis
- 950 Supermoto / Supermoto R
- Engine
- Chassis
- 990 Adventure
- Engine
- Chassis
- 950 Super Enduro
- Engine
- Chassis
- Tolerances, Mounting Clearances
- Tightening Torques
- Engine
- Chassis
Periodic Maintenance Schedule
- 950 Adventure
- 990 Super Duke
- 950 Supermoto
- 990 Adventure
- 950 Super Enduro
- Maintenance Work
- Changing The Engine Oil And The Oil Filter
- Cleaning The Oil Screens In The Engine And Oil Tank
- Cleaning The Magnets On The Drain Plug For The Engine And Oil Tank
- Replacing The Spark Plugs
- Checking And Adjusting The Valve Clearance
- Checking The Clutch Lining
- Checking The Clutch Pressure Booster System
- Clean The Oil Jet For The Clutch Lubrication
- Carburetor Synchronization
- Idle Adjustment 950 Adventure
- Idle Adjustment 950 Supermoto/Super Enduro
- Check Fault Memory With The Ktm Diagnosis Tool
- Perform A Status Check Using The Ktm Diagnosis Tool
- Replace The O-Ring Of The Fuel Hose Connection
- Checking The Cooling System For Leakage And Antifreeze
- Checking The Radiator Fan For Proper Functioning
- Lubricating The Cables
- Checking The Air Filter, Replacing If Necessary, Cleaning The Air Filter Box
- Checking The Brake Fluid Level, Lining Thickness, Brake Disks
- Changing The Brake Fluid Front
- Changing The Brake Fluid Rear
- Checking The Bolts On The Brake System For Force Fit
- Check Abs Fault Memory With The Ktm Diagnosis Tool
- Cleaning The Dust Boots
- Bleeding The Fork Legs
- Checking The Swing Arm Support
- Checking/Adjusting The Steering Head Bearing
- Checking All Chassis Bolts For Force Fit
- Checking The Spoke Tension And Rim Run-Out
- Checking The Chain And Chain Guides For Wear, Force Fit And Tension
- Checking The Nuts/Bolts On The Engine Sprocket And The Rear Sprocket For The Securing Agent And A Tight Fit
- Checking The Wheel Bearing And Jerk Damper For Clearance
- Servicing The Fork
- Servicing The Shock Absorber
- Cleaning And Greasing The Steering Head Bearing And Sealing Elements
- Cleaning And Adjusting The Carburetor
- Changing The Cooling Liquid
Wiring Diagrams
- 950 Adventure
- Wiring Diagram 2003-2004
- Explanation Of Connectors, Cable Colors
- Wiring Diagram 2005
- Explanation Of Connectors, Cable Colors
- Start System
- Charging System
- Ecu
- Flasher, Horn, Cooling Fan
- Lights
- Lights Usa
- Instruments
- Ground Connection
- Positive Connection
- Connector List 950 Adventure
- Connector Aa - Af
- Connector Ag - Ah
- Connector Ai - Ak
- Connector Al - Am
- Connector An - Ar
- Connector Ar - At
- Connector Au - Aw
- Connector Ax - Az, Ba
- Connector Bb - Bg
- Connector Bh - Bk
- 990 Super Duke / Super Duke R
- Wiring Diagram (Up To The 2006 Model)
- Explanation Of Connectors, Cable Colors
- Start/Charging System (Up To The 2006 Model)
- Start/Charging System (Starting With The 2007 Model)
- Ecu (Up To The 2006 Model)
- Ecu (Starting With The 2007 Model)
- Flasher, Horn, Cooling Fan
- Lights
- Instruments (Up To The 2006 Model)
- Instruments (Starting With The 2007 Model)
- Ground Connection
- Positive Connection
- Connector List 990 Super Duke / Super Duke R
- Connector Aa - Ae
- Connector Af - Ah
- Connector Ai - Al
- Connector Am
- Connector Ao - Ar1
- Connector Ar2 - As
- Connector At - Ax
- Connector Ay - Az, Bb - Bd
- Connector Be - Bi
- Connector Bj - Bv
- Connector Bz, Ca
- Connector Cc - Ck
- Connector Cl - Cq
- Connector Cr, Dj - Dk
- 950 Supermoto / Supermoto R
- Wiring Diagram (Up To The 2007 Model)
- Wiring Diagram (Starting With The 2007 Model)
- Explanation Of Connectors, Cable Colors
- Start/Charging System (Up To The 2007 Model)
- Start/Charging System (Starting With The 2007 Model)
- Ecu
- Flasher, Horn, Cooling Fan
- Lights
- Instruments
- Ground Connection
- Positive Connection
- Connector List 950 Supermoto / Supermoto R
- Connector Aa - Af1
- Connector Af2 - Ah
- Connector Ai - Aj
- Connector Ak - Al2
- Connector Al3 - Am
- Connector Ao - Ar
- Connector As - At3
- Connector At4 - Ax
- Connector Ay - Az, Bb - Bg
- Connector Bi - Bs
- Connector Bv - Bw, Cd, Cr
- Connector Di - Dk
- 990 Adventure
- Wiring Diagram (Up To The 2007 Model)
- Wiring Diagram (Starting With The 2007 Model)
- Explanation Of Connectors, Cable Colors
- Start/Charging System (Up To The 2007 Model)
- Start/Charging System (Starting With The 2007 Model)
- Efi
- Flasher, Horn, Cooling Fan
- Lights
- Instruments
- Abs
- Ground Connection
- Positive Connection
- Connector List 990 Adventure
- Connector Aa - Ae
- Connector Af - Ai
- Connector Aj - Al
- Connector Am - Ao
- Connector Ap - Ar4
- Connector Ar5 - At2
- Connector At3 - Ay
- Connector Az, Ba - Be
- Connector Bf - Bj
- Connector Ca - Ck
- Connector Cl - Cq
- Connector Cr - Cx, Dl-Dm
- Connector Dn - Dp
- 950 Super Enduro
- Wiring Diagram (Up To The 2006 Model)
- Wiring Diagram (Starting With The 2007 Model)
- Explanation Of Connectors, Cable Colors
- Start/Charging System (Up To The 2006 Model)
- Start/Charging System (Starting With The 2007 Model)
- Ecu
- Flasher, Horn, Cooling Fan
- Lights
- Instruments
- Ground Connection
- Positive Connection
- Connector List 950 Super Enduro
- Connector Aa - Af
- Connector Ah - Ai
- Connector Aj - Ak
- Connector Al
- Connector Am - Ao
- Connector Ar - As
- Connector At - Au
- Connector Av - Az
- Connector Ba - Bi
- Connector Bj - Bt
- Connector Bw, Cd - Cr, Di